February 27, 2019
WTI IPSec Server Site-To-Site setup
WTI Devices have the capability to host an IPSec Server process. This allows computers with IPSec client software to create a secure tunnel and maintain a constant connection to a WTI device from a remote location.
The WTI device IPsec default settings are IKEv2 and both ike and esp settings are aes128-sha256-modp4096 (group 16), these defaults can be changed per a connection via the "Tunnel Options" menu option.
There can be up to ten separate IPSec connections defined per a WTI IPSec server. For all ten tunnels there can only be one Server Certificate, one Left ID, one Left Subnet, but for each tunnel you COULD recreate the Server Certificate. When you define these parameters in the first IPSec Server slot they are copied to the other open slots also.
In the scenario the Left is the WTI device (VPN Server) and the right is the machine we are going to export everything to (Linux IPSec Client).
Being an IPSec server that other dev ices connect, this IPSec server should have a fixed IP address or name
Please note IPSec need UDP ports 500 and 4500 open for control paths
Device and Computer Address Examples
WTI Device: eth0: 192.168.0.158, eth1: 192.10.10.134
Linux Computer: 192.168.0.203
WTI DEVICE
On the WTI Device login with your username and password and issue the command:
/VPN
Then choose
3 (IPSec (Server Site-To-Site))
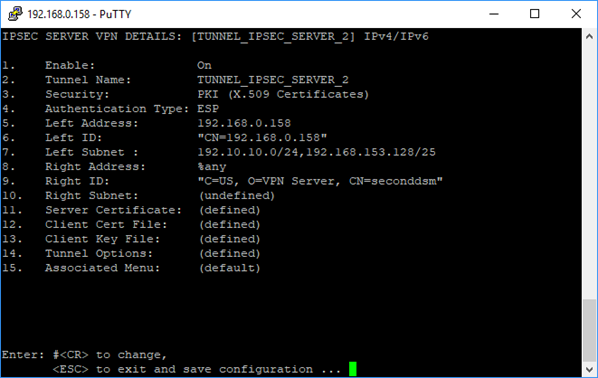
Fill out options 3 through 10 to match the parameters of your network. After you setup these options, choose option 11 and create the Server Certificate for the IPSec Server Configuration.
Left Address: WTI Device IP Address
Left ID: This is incorporated in the Server Certificate; it could be a full DN type of identifier
February 27, 2019
Left Subnet: How the VPN Server hooks up the VPN address to the WTI IP Address
Right ID: This is incorporated in the Client Certificate; DN Identifier for the VPN Client Machine
Server Certificate: This is the one and only Certificate for the VPN Server. This is created after the above parameters have been defined.
Client Cert File: This is the file that is created and will be exported to the VPN Client
Client Key File: When the Client Cert File is created, this file is also created.
Tunnel Options: Additional parameters needed by the VPN Server.
Sample WTI IPSec SERVER Configuration Screens
February 27, 2019
Sample Tunnel Options Parameters

After all the parameters are entered and the certificates are created, these file need to be exported.
- Server Certificate
- Client Cert File
- Client Key File
I export these files, choose the menu option for the Certificate/Key you want and then choose: - Display Server Certificate
This will display the appropriate file, copy this file and the other remaining files to a USB drive
For the purpose of this example, please name the files on the USB drive the following names:
Server Certificate: ca-cert.pem
Client Cert File: seconddsm.crt
Client Key File: seconddsm.key
February 27, 2019
February 27, 2019
LINUX DEVICE
On the Linux device make sure that you have strongSwan IPsec-based VPN loaded.
Copy the file “ca-cert.pem” to “ /etc/ipsec.d/cacerts/ca-cert.pem”
Copy the file “seconddsm.crt” to /etc/ipsec.d/certs/seconddsm.crt
Copy the file “seconddsm.key” to /etc/ipsec.d/private/seconddsm.key
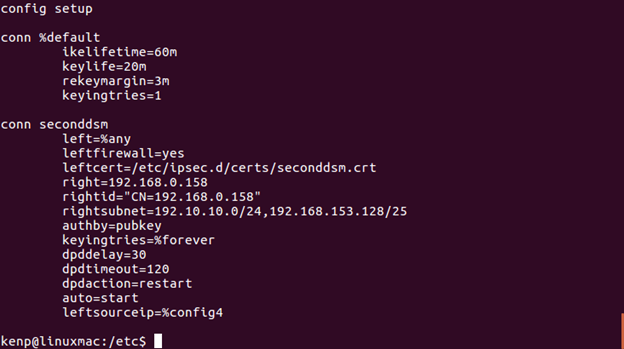
Sample Linux VPN Client Configuration Screens
-
(/etc/ipsec.conf file that matches the WTI VPN Server)
In the file “/etc/ipsec.secrets” the following entry needs to be added.
: RSA /etc/ipsec.d/private/seconddsm.key
(please note the space between the : and RSA)
At this point with the WTI VPN Server running and the Linux client configured, we can start the VPN Client in Debug/Verbose mode
sudo ipsec start --nofork --debug --conf /etc/ipsec.conf
February 27, 2019
If not running in debug mode you can enter this text to see the status of the IPsec sessions
sudo ipsec status
If the connection is made, from the Linux computer I can now SSH into 192.10.10.134
To check the key are installed you can type:
sudo ipsec listcerts
Diffie-Hellman MODP Group listing
Diffie-Hellman group 1 - 768 bit modulus
Diffie-Hellman group 2 - 1024 bit modulus
Diffie-Hellman group 5 - 1536 bit modulus
Diffie-Hellman group 14 - 2048 bit modulus
Diffie-Hellman group 15 - 3072-bit modulus
Diffie-Hellman group 16 - 4096-bit modulus
Diffie-Hellman group 17 - 6144-bit modulus
Diffie-Hellman group 18 - 8192-bit modulus
Diffie-Hellman group 19 - 256 bit elliptic curve
Diffie-Hellman group 20 - 384 bit elliptic curve
Diffie-Hellman group 21 - 521 bit elliptic curve
Diffie-Hellman group 24 - modular exponentiation group with a 2048-bit modulus and 256-bit prime order subgroup